You know the keyboard. The one that still works, but doesn’t feel right anymore. WASD has that gritty drag. The spacebar sounds loose. A few keys need a harder press after a long week of gaming, work, or late-night Discord calls. It’s common to wait until something gets bad enough to be annoying. That’s usually later than they should.
If you want to know how to clean a mechanical keyboard properly, the good news is you don’t need a fancy kit or a weekend teardown every month. You need a routine, the right cleaner, and a clear line between what matters and what’s just enthusiast overkill. That matters even more on budget boards, where good switch feel can be dragged down by cheap stabilizers, desk snacks, pet hair, and months of skin oils.
- Clean weekly with a quick 5-minute brush and wipe to prevent buildup that ruins switches faster than dust alone.
- Use 90%+ isopropyl alcohol for grime — it dries fast and won’t damage most plastics. Skip water-heavy cleaners on anything near electronics.
- Skip the dishwasher and submerged keycap soaks unless you fully air-dry for 48+ hours — moisture is what kills boards, not dust.
- A soft toothbrush, a microfiber cloth, and IPA covers 90% of cleaning needs. Specialty kits are nice, not necessary.
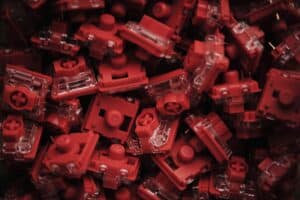
- Stabilizers and switches need different care — never lube switches with the same product you use on stabs, and don’t over-tighten screws on reassembly.
Table of Contents
Why a Clean Keyboard Is Your Unfair Advantage
A dirty keyboard doesn’t just look bad. It changes how the board feels under your fingers, and in games that matters immediately.
In an FPS, one sticky movement key or a sluggish spacebar can throw off timing. In an MMO, grime shows up as inconsistent repeat presses during longer sessions. In a streaming setup, the problem is even more obvious. Viewers notice dirty gear fast, and you notice every rattly modifier key when your mic is live.
Mechanical boards are built to last, but only if you treat them like hardware instead of a disposable accessory. Most mechanical keyboards are rated for 50 to 80 million keypresses, while membrane boards typically last 5 to 10 million presses, according to HP’s overview of mechanical keyboard maintenance. That same source notes that dust, oils, and debris can reduce performance up to 30 to 50% faster through switch degradation when maintenance gets ignored.
That’s the part a lot of gamers miss. Durability isn’t automatic. It’s conditional.
Practical rule: If your keyboard feels worse than it did a month ago, cleaning it will usually do more for performance than tweaking software settings.
Budget boards benefit the most from regular care because they often have solid switch value but weaker stabilizers, thinner cases, and less tolerance for grime buildup. You don’t need to baby them. You do need to stop feeding them.
If you’re still deciding whether a mechanical board is worth maintaining in the first place, this breakdown of mechanical vs membrane keyboard differences helps frame why the upkeep pays off. And if your keyboard pulls double duty for gaming and work, a clean desk setup supports the same habits covered in this guide for elevating home office productivity.
Your Cleaning Toolkit: Budget-Friendly Options
Most cleaning guides act like you need a dedicated kit before you can start. You don’t. Some purpose-built tools are better, but several household stand-ins work fine if you use them carefully.
A lot of existing advice pushes compressed air, pullers, and small vacuums. That’s useful, but incomplete. As noted in this cleaning guide discussing low-cost alternatives, common recommendations include compressed air at budget-can range and keycap pullers at a low-cost tier, while a soft toothbrush or old makeup brush can do the dusting job for less. The same source says forum data shows most budget mechanical keyboards have removable keycaps via simple prying, so a puller is helpful but not always essential.
Ideal setup
If you clean keyboards regularly, these are worth having:
Wire keycap puller for removing caps with less risk of marking the sides
Soft brush for sweeping debris around switches and plate cutouts
Microfiber cloth for the case and keycap tops
Cotton swabs for tight corners and stabilizer areas
90%+ isopropyl alcohol for oil, residue, and safe evaporation
Budget setup that still works
If you’re trying to spend as little as possible, use what you already have:
Soft toothbrush or old makeup brush instead of a specialty brush
Plastic card edge or guitar pick for carefully lifting keycaps on boards that allow it
Household vacuum hose used gently at an angle for loose debris only
Microfiber glasses cloth or clean soft rag for wiping surfaces
Cotton swabs and high-percentage isopropyl alcohol for detail work
What works and what doesn’t
A few trade-offs are worth calling out:
| Tool or cleaner | Good for | Risk or downside |
|---|---|---|
| Wire puller | Safer keycap removal | Extra purchase if you rarely deep clean |
| Toothbrush | Cheap dust removal | Too much force can scratch soft plastic |
| Vacuum hose | Lifts crumbs fast | Strong suction can tug on loose caps if you rush |
| 90%+ alcohol | Oils, grime, fast drying | Can strip lube from some parts if overused |
| Water-heavy cleaners | General household surfaces | Bad choice around exposed electronics |
For surface disinfection questions, it’s useful to compare hydrogen peroxide vs alcohol before you start mixing random cleaners. For keyboard work, the simpler rule is better. Stick to high-percentage isopropyl alcohol on the board itself.
If long sessions leave your wrists planted on the desk edge, pairing a clean board with a proper wrist rest for a keyboard setup also helps keep the whole station more comfortable and easier to maintain.
The Weekly Refresh: A 5-Minute Routine
If you snack at your desk, have pets, or game in a dusty room, this is the habit that keeps your keyboard from turning into a project.
Start by unplugging the keyboard. Then hold it over a trash can or sink, turn it upside down, and give it a few firm shakes. You’re not trying to break anything loose. You’re clearing the obvious stuff before it gets ground deeper under the keycaps.
Next, work across the rows with air or a soft brush. Push debris outward instead of just moving it from one pocket to another. A vacuum hose can help here, but keep it angled and don’t jam it down onto the keys.
The fast clean isn’t about making the keyboard spotless. It’s about stopping crumbs and dust from becoming sticky grime.
Finish with a dry microfiber wipe across the keycaps and top case. If a few caps feel greasy, lightly dampen part of the cloth with isopropyl alcohol and wipe only the tops. Don’t soak the cloth and don’t let liquid run down around the stems.
A simple weekly routine matters more than occasional heroic cleaning. Most dirty keyboards I’ve fixed weren’t neglected because the owner was careless. They were neglected because the owner thought cleaning had to be a full teardown every time. It doesn’t.
The Full Reset: A Step-by-Step Deep Clean
The deep clean is what you do when the board feels rough, looks grimy between every row, or has reached the point where a quick refresh just moves dirt around.
An uncleaned keyboard can collect 10,000-100,000 bacteria per square centimeter between keys after a month of daily use, and 90%+ isopropyl alcohol is considered the gold standard because it eliminates 99.9% of bacteria and dissolves oils without residue, as covered in Kinetic Labs’ mechanical keyboard cleaning guide. That same guide also supports soaking keycaps in warm soapy water and using cotton swabs for the gaps around switches.
Before you remove anything
Do these first:
Unplug the keyboard
Take a clear photo of the layout
Set out a towel or tray for keycaps
Keep liquids away from the exposed board until you’re ready to use them carefully
That photo saves time on reassembly, especially on smaller layouts with non-standard bottom rows. It also keeps you from forcing the wrong cap onto the wrong switch.
Remove and wash the keycaps
Pull the caps off steadily. Don’t twist hard. On budget boards, the stems usually survive just fine if you lift straight up and stay patient.
Once the caps are off, drop them into warm water with a little dish soap. Let them soak, swish them around, then rinse them well. After that, spread them out on a towel and let them air dry completely. Don’t rush this part with heat.
Clean the board itself
With the caps removed, you can finally see where the mess lives. Brush out loose debris first. Get into the corners, around the switch housings, and along the top plate if your keyboard has one.
Then move to cotton swabs lightly dampened with isopropyl alcohol. Focus on the shiny spots around frequently used keys, the edges of the case, and the grime that sticks near the stabilizers. You want the swab damp, not dripping.
Here’s a visual walkthrough if you want to compare your process to a real teardown.
What not to do during a deep clean
A lot of keyboard damage comes from impatience, not dirt.
Don’t flood the plate area with cleaner
Don’t use household spray cleaners on exposed electronics
Don’t scrape with metal tools around switches or plastic edges
Don’t reassemble early because the parts “seem dry enough”
If there’s any doubt about moisture, wait longer. A keyboard can survive being dirty for another hour. It might not survive trapped liquid.
If you’re new to mechanical boards in general, understanding mechanical keyboard switches explained clearly helps a lot here. It makes it easier to see which parts are just cosmetic dirt and which parts can affect feel or input reliability.
Drying matters more than scrubbing
The keycaps need to be fully dry before they go back on. The board also needs time after any alcohol detail work, especially around tight switch gaps and stabilizer housings. Air drying beats shortcuts.
This is the difference between a keyboard that feels refreshed and one that starts acting strange after you “cleaned” it. Most post-cleaning issues come down to liquid where it shouldn’t be, or keycaps going back on before everything has settled.
Finishing Touches: Stabilizer and Switch Care
This is the part most guides rush past, and it’s exactly where budget keyboards often feel cheap even when the switches are fine.
Stabilizers sit under larger keys like the spacebar, Enter, Shift, and Backspace. They keep those keys from tipping side to side. On entry-level boards, they also collect grime fast and start rattling, ticking, or feeling uneven long before the switches wear out.
According to Das Keyboard’s updated guide on mechanical keyboard cleaning, stabilizer issues account for 40% of post-cleaning complaints in enthusiast communities for budget TKL and 60% layouts. That same source notes that alcohol-soaked Q-tips can clean housings but may dry out factory lube, and that a thin dielectric grease application can cut rattle by 90%.
How to clean stabilizers without overdoing it
Remove the big keycap that’s giving you trouble. Then:
Brush first so you’re not turning dust into sludge
Use a lightly damp cotton swab on visible grime around the stabilizer wire and housing
Avoid soaking the area with alcohol
Apply a tiny amount of dielectric grease with a toothpick if the wire sounds dry or rattly
Less is better here. Too much grease makes the key feel sluggish and attracts more dirt later.
A rattly spacebar after cleaning usually means the stabilizer lost lubrication, not that the switch suddenly went bad.
Spot-cleaning one sticky switch
If a single key feels sticky after a minor spill, don’t jump straight to replacing anything. Pull that cap, brush out the area, and use a very small amount of alcohol on a swab around the exposed switch housing. Press the switch a few times after the area dries.
If the switch still feels wrong, the problem may be inside the switch itself rather than on the surface. At that point, basic cleaning has done its job, and replacement or deeper switch work becomes the next step. If you want to understand the common switch families before making that call, this guide to what Cherry MX switches are and how they differ gives useful context without overcomplicating it.
Reassembly and Fixing Common Issues
Putting the keyboard back together should feel easy. If it doesn’t, stop and check what’s fighting you.
Use the photo you took earlier and press each keycap straight down until it seats properly. Don’t force a cap that looks slightly off-center. Pull it back off and realign it. That matters most on larger keys, where stabilizers can trick you into thinking the cap is on when it isn’t fully connected.
A lot of people assume that once the board is clean, any weird behavior means they broke something. Usually they didn’t. They just need one more pass on the obvious trouble spots.
Quick fixes after cleaning
A key feels mushy or won’t register
Pull the cap and reseat it. If that doesn’t fix it, let the board dry longer before testing again.The spacebar rattles more than before
Check the stabilizer wire area. It likely needs a tiny fresh dab of grease.A key types the wrong character or behaves oddly
Moisture is still the first suspect. Unplug the board and give it more drying time.One key still feels rough
Remove that cap again and inspect for trapped debris around the switch opening.
If noise is part of why you started cleaning in the first place, it’s also worth learning which quietest mechanical keyboard switches fit your setup better. Cleaning helps a lot, but it won’t turn a loud switch into a silent one.
A clean mechanical keyboard should feel consistent, not just clean-looking. If the board is still unreliable after proper drying, careful reassembly, and basic stabilizer care, then the issue probably isn’t dirt anymore. That’s useful information too. It tells you whether the keyboard still has life left or whether the weak point is the hardware itself.
Frequently Asked Questions About Cleaning Mechanical Keyboards
How often should you clean a mechanical keyboard?
Do a quick brush-and-wipe weekly to prevent buildup, and a full deep clean every three to six months depending on how heavily you use the board. Heavy users — gamers, streamers, snackers at the desk — should lean toward the shorter interval.
Can you wash mechanical keyboard keycaps in water?
Yes, keycaps can be washed in warm soapy water as long as they are fully air-dried before reinstalling. Avoid the dishwasher — heat can warp keycaps and fade legends. Never submerge the PCB or switches.
Will isopropyl alcohol damage mechanical switches?
Used in small amounts on a cloth or cotton swab, 90%+ isopropyl alcohol is safe on the keyboard frame and keycaps. Avoid soaking switches directly — alcohol can strip factory lube and cause inconsistent feel over time.
Is it OK to use compressed air on a mechanical keyboard?
Yes, compressed air is fine for surface dust between keys. Hold the can upright and use short bursts to avoid propellant spitting onto the board. Skip compressed air on stabilizers and exposed switch internals — it can dislodge factory lube.
If you’re building a gaming or streaming setup that needs to perform well without wasting money, Budget Loadout is worth bookmarking. It’s built for people who care about value, durability, and real trade-offs, not marketing fluff.
Related Articles