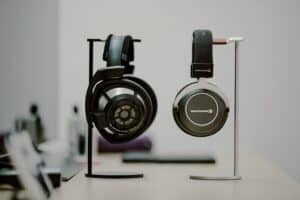
For gamers and streamers, finding the best budget USB microphone comes down to one question: how much do you need to spend for clear audio? The answer is, not as much as you think. You don’t have to spend hundreds of dollars for a mic that sounds clean and articulate. The market for value-focused gear is strong, delivering solid build quality and vocal clarity for well under $100.
- USB microphones plug directly into your PC with no audio interface needed, making them the simplest upgrade for streaming and voice chat
- Condenser USB mics between $40-80 deliver broadcast-quality audio that rivals mics costing twice as much
- Cardioid pickup pattern is essential for gaming — it captures your voice from the front while rejecting keyboard clicks and background noise
- A boom arm or desk stand keeps your mic at the correct distance and angle, dramatically improving audio quality compared to using the included stand
- The Audio-Technica AT2020USB-X is our top overall pick, while the HyperX SoloCast offers the best value under $40 for gamers on a tight budget
Table of Contents
- Studio-quality sound with wide frequency response
- Cardioid pattern effectively rejects background noise
- USB-C plug-and-play with zero-latency headphone monitoring
- Needs shock mount for desk vibrations
- Best with a boom arm or stand
- Larger than compact USB mics
- Compact footprint fits easily on any desk
- Tap-to-mute feature with clear LED indicator
- Clean audio output with minimal processing needed
- Fixed cardioid; no other patterns
- Short USB-C cable
- No headphone monitoring jack
- Rode's broadcast-quality audio in a compact package
- Built-in pop filter reduces plosive sounds
- Magnetic desk stand with clean cable management
- Fixed cardioid; no other patterns
- Compact stand sits lower than boom arms
- Priciest in the budget range
What Actually Matters in a Budget USB Microphone
Shopping for a budget USB mic can feel like decoding a foreign language. Product pages are crammed with technical jargon like “192kHz/24-bit sampling rate” and “studio-grade condenser capsule,” but those specs rarely tell you how the mic will perform on your desk.
To make a smart choice, you have to cut through the marketing. The key is to focus on three things that define a quality microphone for gaming and streaming: audio clarity, noise isolation, and build quality.
The Core Pillars of a Good Budget Mic
Let’s break down what separates a reliable mic from a cheap piece of plastic that will frustrate you.
Audio Clarity (How You Actually Sound): This is about how accurately the mic captures your voice. A good mic makes you sound natural and full, not thin or muffled. The goal is clear communication, whether you’re making callouts in an FPS or chatting with your stream.
Noise Isolation (Ignoring Keyboard Clicks): This is critical for gamers. Noise isolation is the mic’s ability to focus on your voice while rejecting distracting sounds—keyboard clatter, mouse clicks, and the hum of your PC fans. This is almost entirely determined by its pickup pattern.
Build Quality & Durability (Will It Last?): A budget mic shouldn’t feel disposable. Build quality covers the materials (metal vs. plastic) and the stability of the included stand. A durable microphone will survive accidental bumps and deliver consistent performance.
Key Takeaway: A mic’s real-world value is defined by how well it isolates your voice, how natural it sounds, and whether it can handle daily use—not by a long list of technical specs.
The Tech Specs That Actually Matter
While you can ignore most of the fluff, a couple of specs have a direct impact on your experience. The most important one is the pickup pattern, which dictates where the microphone “listens.”
Almost every recommended budget gaming mic uses a cardioid pickup pattern. Think of it as a heart-shaped area of sensitivity pointed at the front of the microphone. This pattern is effective for a desk setup because it captures what’s in front (your voice) while rejecting sounds from the sides and back (your keyboard and mouse).
Another factor is the build material. A microphone with a metal chassis and grille will almost always be more durable than an all-plastic one. It’s better at handling vibrations and minor bumps, which means it will last longer.
The USB microphone market has expanded, with projections showing its value could hit around $3.1 billion by 2032. This competition is good for consumers—it forces manufacturers to pack better build quality and features into lower price points. To explore more gear, you can also check out our complete guide to budget audio gear.
A Head-to-Head Comparison of Top Budget Mics
Picking the right budget USB microphone is less about finding a single “winner” and more about understanding the tradeoffs. You’re navigating a field of solid contenders, and the best one for you depends on what you’re doing. Instead of just listing features, we’re going to break down the real-world performance of four popular models: the Audio-Technica AT2020USB-X, HyperX SoloCast, Rode NT-USB Mini, and Elgato Wave Neo.
This isn’t about which mic looks best on paper. It’s about which one delivers the most practical value for your gaming or streaming needs.
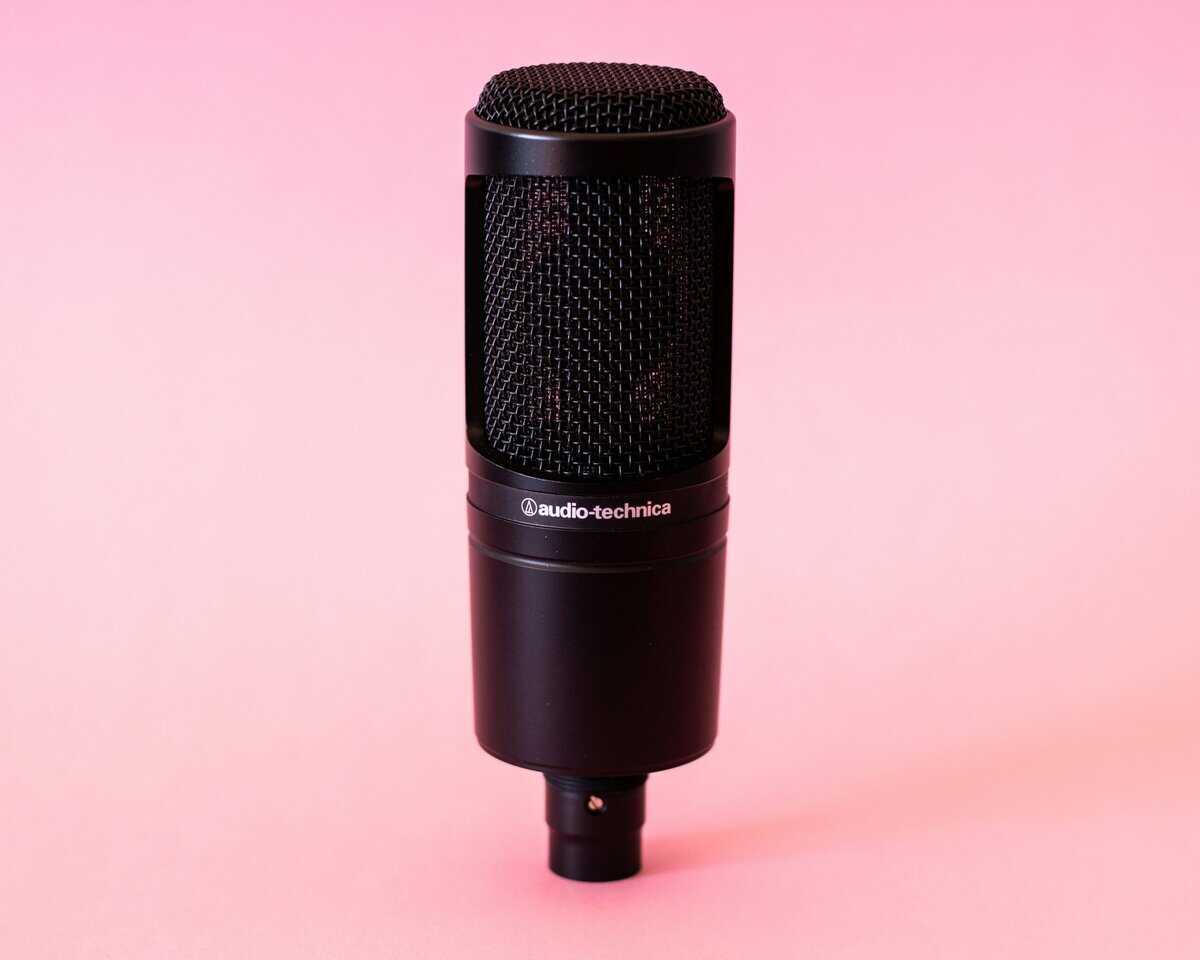
Audio-Technica AT2020USB-X: The Studio Legacy
The Audio-Technica AT2020 has been a home studio staple for years, and the AT2020USB-X brings that same DNA into a modern plug-and-play format with USB-C connectivity. Its core strength is its detailed and accurate sound capture, thanks to a condenser capsule that performs well for its price.
Sound Profile:
The AT2020USB-X gives you a crisp, clear, and relatively uncolored audio signal. For gamers, this is a double-edged sword. It captures the full range of your voice with professional-grade clarity, but it can be unforgiving out of the box. Without software EQ, your voice might sound thin compared to mics tuned specifically for broadcasting.
Build Quality and Durability:
The AT2020 USB+ has a full metal body and a heavy-duty metal mesh grille that feels substantial and built to last. It will withstand the bumps of a desk setup far better than its plastic competitors. The included tripod is flimsy, though—this mic performs best when mounted on a proper boom arm to isolate it from desk vibrations.
The Tradeoff:
You get exceptional audio fidelity and a tank-like build, plus a capacitive touch-to-mute button with an LED indicator. The main tradeoff is that while the mic sounds great out of the box, unlocking its full potential requires using it with recording software for EQ adjustments. The mute button is also touch-sensitive rather than a physical click, which some users may accidentally trigger.
HyperX SoloCast: The No-Frills Performer
The HyperX SoloCast was built for one purpose: deliver clean, reliable voice comms with zero fuss. It strips away non-essential features to focus on core performance, making it a popular choice for gamers who want something that just works.
Sound Profile:
Out of the box, the SoloCast has a warm and rich vocal tone. It’s tuned to emphasize the mid-range frequencies of the human voice, which makes you sound clear in Discord or on stream without changing settings. It handles background noise reasonably well, though its cardioid pattern isn’t the tightest, so loud keyboard clicks might still bleed through.
Build Quality and Durability:
The body is made of a dense plastic that feels solid, not cheap. It’s lightweight but doesn’t feel fragile. The included stand is small, stable, and offers a good range of tilt. The main durability advantage here is its simplicity—with no knobs or extra buttons, there are fewer parts that can break.
Key Insight: The SoloCast’s most practical feature is its tap-to-mute sensor. For fast-paced FPS or MMO gaming, the ability to instantly and silently mute your mic with a single touch is a quality-of-life advantage that more expensive microphones often lack.
The Tradeoff:
Simplicity is also its biggest weakness. The SoloCast has no gain control and no headphone jack for zero-latency monitoring. What you plug in is what you get. This makes it a good choice for plug-and-play use, but a poor one for anyone who wants to fine-tune their audio.
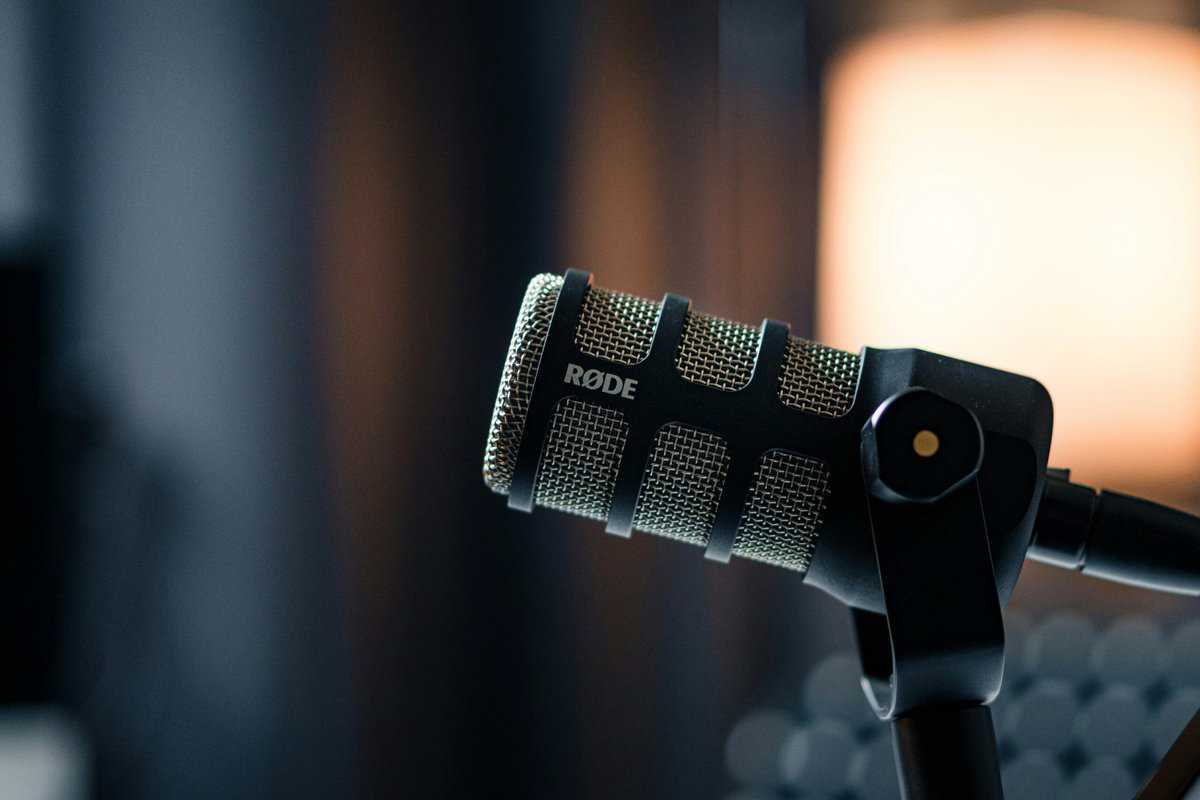
Rode NT-USB Mini: The Compact Powerhouse
Rode is a major name in pro audio, and the NT-USB Mini packs much of that brand’s quality into a small, affordable package. It hits a sweet spot between the raw performance of the AT2020 and the simple usability of the SoloCast.
Sound Profile:
The NT-USB Mini provides a polished, broadcast-style sound from the start. It has a built-in pop filter that reduces plosives (harsh ‘p’ and ‘b’ sounds), resulting in smooth audio that’s ready for streaming. The sound is warm and full, making it flattering for most voices.
Build Quality and Durability:
The mic has a reassuring heft, combining a heavy-duty nylon resin body with a steel grille. Its best feature is the unique magnetic desk stand, which is stable and offers a 360-degree rotation. This design also dampens desk vibrations, making it one of the best included stands available.
The Tradeoff:
While the NT-USB Mini sounds good on its own, you need to use Rode’s software (Rode Connect) to unlock its best features, like a noise gate and compressor. Also, its proprietary magnetic connector means you have to pop the base off to attach it to a standard boom arm—a minor inconvenience.
Elgato Wave Neo: The Software Specialist
The Elgato Wave Neo is aimed squarely at streamers who use a software ecosystem. The Neo is less about raw audio specs and more about how it integrates into a content creator’s workflow, especially if you’re already using other Elgato gear.
Sound Profile:
The Neo’s audio quality is clean and perfectly serviceable, designed for speech. It isn’t as detailed as the AT2020 or as naturally warm as the SoloCast, but it’s a solid foundation meant to be shaped by software. Its real power comes from the Wave Link software—a virtual mixer that lets you independently control audio from your game, music, and Discord.
Build Quality and Durability:
The build is mostly plastic and feels less premium than the other mics here. However, the design is practical. It comes with a raised desktop stand to get the mic closer to your mouth and has an integrated pop filter. The construction is lightweight, prioritizing function within the Elgato ecosystem over rugged durability.
The Tradeoff:
The Wave Neo is entirely dependent on its software. Without Wave Link, it’s just a decent-sounding microphone. Its audio performance is good, but its value proposition is tied to those mixing features. If you don’t plan on using audio routing software, you can get better raw sound quality for the same money elsewhere.
Budget USB Microphone Practical Comparison
To make the choice clearer, here’s a direct comparison focused on how these microphones perform in real-world gaming and streaming situations. This isn’t about specs, but about practical application.
| Microphone | Primary Use Case | Sound Profile | Build Quality | Key Feature / Tradeoff |
|---|---|---|---|---|
| Audio-Technica AT2020USB-X | Aspiring creators, home recording | Crisp, detailed, accurate (requires tuning) | Excellent (All-Metal) | Pro-grade audio fidelity / Touch-sensitive mute can be finicky |
| HyperX SoloCast | Plug-and-play gaming, Discord | Warm and broadcast-ready out of the box | Good (Dense Plastic) | Tap-to-mute sensor is practical / Zero onboard controls |
| Rode NT-USB Mini | Streaming, all-around content creation | Polished and smooth, good for vocals | Very Good (Resin & Steel) | Excellent magnetic stand / Best features require software |
| Elgato Wave Neo | Streamers in the Elgato ecosystem | Clean and serviceable (designed for software EQ) | Average (Plastic) | Powerful Wave Link software / Heavily software-dependent |
Ultimately, the best microphone comes down to your priorities. For sounding clear in-game with zero effort, the SoloCast is a strong choice. If you’re a budding streamer who values software control, the Wave Neo is built for that purpose. And if you want the best possible raw audio and don’t mind some tweaking, the AT2020USB-X remains a solid option.
Choosing the Right Mic for Your Gaming Style
The best mic for a streamer is often a poor choice for someone in competitive FPS matches. Different games create different audio problems. A mic that sounds good in one situation can be a liability in another, so matching the hardware to your main game is important.
Instead of hunting for a “one-size-fits-all” mic, find one whose strengths solve your biggest audio issues—whether that’s keyboard clatter, a thin voice, or a lack of easy-to-reach controls mid-game.
For Competitive FPS Gaming (Valorant, CS2)
In games like Valorant or CS2, communication is key. Your teammates need to hear your callouts clearly, not the clicks of your mouse or the sound of your mechanical keyboard.
For this type of gaming, noise isolation is your number one priority.
Look For: A microphone with a tight cardioid pickup pattern. This is more focused than a standard cardioid, meaning it does a better job of rejecting sounds from the sides and back.
Prioritize: A simple, can’t-miss mute function. A tap-to-mute sensor is better than a tiny button you have to find mid-firefight.
Build Quality: A dense, stable build with a solid desk stand helps absorb vibrations from intense mouse movements, preventing thuds from being broadcast to your team.
The HyperX SoloCast is a strong contender here. Its sound is clear for voice comms, its cardioid pattern isolates your voice well, and its tap-to-mute feature is a practical advantage.
For MMO and RPG Gaming (WoW, FFXIV)
MMO and RPG players are in it for long sessions. You’re coordinating raid strategies or roleplaying, so you’re talking for hours. Here, your vocal tone matters more than aggressive noise cancellation.
If your mic sounds harsh or thin, your guildmates will experience listener fatigue. The focus shifts to a natural, rich vocal sound that’s easy on the ears.
A microphone that produces a warm, full-bodied sound will make your voice more pleasant to listen to during extended gaming sessions. This prevents “listener fatigue” for your teammates and ensures your communication remains clear.
You want a mic that captures the details of your voice without sounding overly processed. The Rode NT-USB Mini excels here. Its capsule is tuned for a polished, broadcast-style vocal sound out of the box, so you sound good with minimal effort. Its heavy magnetic stand also provides good isolation from desk bumps.
For Beginner Streamers
Streaming adds complexity. Your mic is now a tool for entertaining an audience, so your audio quality needs to be a step above standard in-game chat.
New streamers need to balance good sound, useful features, and simple software.
Sound Profile: A mic with a warm, broadcast-like quality is generally best. It’s flattering for most voices and sounds more professional.
Software Integration: Mics that come with software for mixing audio sources (like your game, music, and voice) are a significant advantage.
Connectivity: A built-in headphone jack for zero-latency monitoring is useful. It lets you hear exactly what your audience hears in real-time.
The Elgato Wave Neo was built for this role. Its raw audio quality is solid, but its main strength is the Wave Link software, which acts as a virtual audio mixer. It makes controlling your stream’s sound much easier for beginners.
Of course, audio is just one piece of the puzzle. For a complete look at your setup, check out our guide on the best gaming headsets under $50 to make sure what you’re hearing is as good as what you’re broadcasting.
Getting Your Microphone Dialed In
Owning a good budget USB mic is only half the battle. Good gear with a poor setup will always sound disappointing. Getting clean, professional audio comes down to a few fundamental tweaks.
Before you think about software, get the physical placement right. This is the single most important thing you can do to improve your sound.
Mastering Physical Placement
Your first move? Get the mic off your desk. The little tripod stands bundled with most budget mics are a direct pipeline for every keyboard slam and desk bump to travel straight into your audio. A boom arm is a necessary accessory, not a luxury.
Isolate from Vibrations: A boom arm lifts the mic off the desk, physically decoupling it from the thumps of intense gameplay.
Optimal Positioning: It lets you put the mic in the ideal spot: close to your mouth but out of your line of sight.
The target is usually 4-6 inches from your mouth, positioned just off to the side. This angle helps reduce plosives—those harsh air blasts from “p” and “b” sounds—while keeping your voice clear.
Pro Tip: If a boom arm isn’t in the budget, put your mic’s desk stand on a stack of books or a thick mousepad. It’s a temporary solution that can dampen some desk vibrations until you can upgrade.
Setting Your Input Gain Correctly
Once your mic is in position, set your levels. The goal is to find a balance where your voice is loud and clear without clipping—a distortion that happens when the audio signal is too high.
Setting your gain is simple:
Open your computer’s Sound settings.
Select your USB microphone as the input device.
Find the input volume or gain slider.
Speak into the mic at a normal volume.
Adjust the slider so the level meter bounces around 75-80% of the maximum.
This leaves you enough headroom to avoid distortion if you get excited and shout during a game. Clipping is irreversible and can ruin a stream or recording.
Basic Software Tuning with Free Tools
With your physical setup and gain levels sorted, you can add a final layer of polish with free software. The tools built into broadcasting software like OBS Studio can make a budget mic sound more expensive than it is.
Simple OBS Audio Filters:
Noise Gate: This filter automatically mutes your mic when you aren’t talking, killing keyboard clicks and PC fan hum between sentences. Start with the default settings and adjust the thresholds until background noise vanishes but your voice still comes through cleanly.
Compressor: A compressor evens out the volume of your voice, making quiet parts louder and loud parts quieter. This creates a more consistent, professional sound. A gentle ratio of 3:1 is a good starting point for vocals.
These physical and software adjustments will elevate your audio from “working” to “good.” If you want to see how this fits into a larger content creation plan, check out our guide on building a complete streaming setup for beginners.
Considering Upgrade Paths and Alternatives
Think of your first budget USB mic as a starting point. Knowing where your purchase fits into the bigger picture of audio gear helps you make a smarter decision. It’s tempting to grab the absolute cheapest mic you can find, but it’s critical to understand the tradeoffs and know your next logical steps.
This is especially true for sub-$40 mics. They might look like a bargain, but their limitations appear fast: flimsy plastic construction, thin audio, and almost zero ability to reject background noise. They are not recommended for streaming or content creation.
The Next Step Up: Premium USB Mics
Once you’ve outgrown your entry-level mic, the most logical upgrade is to a premium USB model. This tier, which includes mics like the Shure MV7, represents a significant jump in performance without adding much complexity.
What do you get by moving to this level?
Superior Audio Capture: The condenser or dynamic capsules in these microphones are higher quality, resulting in a richer, more detailed vocal tone.
Enhanced Build Quality: You’ll find full-metal construction, better internal shock mounting, and more robust components, improving both durability and sound quality.
Useful Onboard Controls: Features like a physical gain dial, multiple polar patterns, and more sophisticated DSP processing become standard.
This upgrade path is ideal for streamers who want to elevate their sound quality while sticking with the plug-and-play convenience of USB.
For many gamers and streamers, a premium USB microphone is the endgame. It delivers broadcast-quality audio with the simplicity required for a fast-paced workflow.
The Major Leap: An XLR Setup
When you’re ready for maximum control and the highest audio fidelity, the next step is moving to XLR microphones. This is a fundamental shift in your audio setup.
An XLR microphone doesn’t plug directly into your computer. It connects via an XLR cable to an audio interface, which then connects to your PC via USB.
This system offers advantages over any USB microphone. The audio interface’s dedicated preamps provide a cleaner, more powerful signal, letting the microphone capture your voice with superior clarity. It also gives you flexibility to swap out different XLR mics and use professional-grade hardware.
The jump to an XLR setup requires a bigger investment, but it unlocks a ceiling of audio quality that the best USB microphone can’t reach.
Got Questions About Budget Mics? We’ve Got Answers
Even after comparing the top contenders, a few specific questions always pop up. Let’s clear up those final doubts.
Do I Really Need a Pop Filter for a Budget Mic?
Yes. A pop filter is a non-negotiable accessory that stops plosives. Those are the harsh pops you get from ‘p’ and ‘b’ sounds hitting the microphone’s diaphragm too hard.
Many budget mics come with a small foam cover, but an external nylon or metal mesh pop filter is more effective. It’s one of the cheapest and most impactful upgrades you can make. Without one, you’ll be fighting those pops in your recordings later.
Is a Condenser or Dynamic Mic Better for a Noisy Room?
For a noisy room, a dynamic microphone is almost always the better choice, but they’re less common in the budget USB market. Most affordable USB mics are condensers, which are more sensitive and will pick up more background noise.
You can still get good results with a condenser mic in a loud environment:
Pick a Tight Pattern: Look for a mic with a tight cardioid pickup pattern to reject noise from the sides and back.
Get Close: Position the microphone just 3-5 inches from your mouth. This maximizes your voice and minimizes everything else.
Lower Your Gain: Turn down the mic’s input gain to make it less sensitive to distant sounds.
This technique is about improving your signal-to-noise ratio. By making your voice much louder to the mic than the background noise, you can make a sensitive condenser mic work in a less-than-ideal space.
Why Does My New USB Mic Sound So Quiet?
Low volume is a common issue, but it’s rarely a sign of a faulty microphone. It’s almost always caused by incorrect gain settings.
First, check that the mic is set as your default input device in your computer’s sound settings. Next, find the input volume or gain control. This might be a physical knob on the microphone or a slider in your operating system’s sound control panel.
Start speaking into the mic and slowly increase the gain. Watch the audio meter in your recording software and aim for your voice to consistently peak around -12dB. If you push it too high, your audio will clip and distort. Finding that sweet spot is the key to a clean, strong signal.
At Budget Loadout, we provide practical guides to help you build a high-performance gaming setup without overspending. Find more direct reviews and recommendations at https://budgetloadout.com.
Related Articles